
The Bread Slicer Buying Guide: Match the Machine to Your Loaf
A bread slicer saves you time every single day: faster output, consistent slices, better presentation, and less strain on your staff. But pick the wrong one, and you will deal with jams, torn slices, and messy cleanup that becomes a daily frustration.
No brand names. No prices. Just practical advice based on what bread you actually sell.
Start with Your Bread, Then Pick the Machine
Bread slicers are not one-size-fits-all. The bread you sell determines what matters most.
| What You Slice Most | What to Prioritize | Why |
|---|---|---|
| Soft sandwich loaves | Consistent thickness + fast speed | High volume means every extra second adds up |
| Crusty artisan loaves | Stable feed + clean cuts | Hard crust can pull blades off track or tear the bread |
| Mixed loaf lineup | Flexible loading + easy adjustment | Reduces staff confusion and mistakes |
A common mistake: Slicing warm bread. Warm loaves are soft and sticky—they don't slice cleanly, they crumble. Even 10–15 minutes too early can double the crumb waste. Let bread cool completely before slicing. This is rule number one.
Match Capacity to Your Peak Volume
If you sell 200 loaves on Saturday but only 60 on weekdays, size for 200—not 60. Peak demand is when slicing becomes the bottleneck.
| Peak Daily Output | Recommended Machine |
|---|---|
| 10–30 loaves | Light-duty countertop |
| 30–100 loaves | Mid-duty countertop or compact floor model |
| 100–200+ loaves | Floor model with heavier blade frame and larger motor |
| Sandwich line bottleneck | Faster feed + higher throughput model |
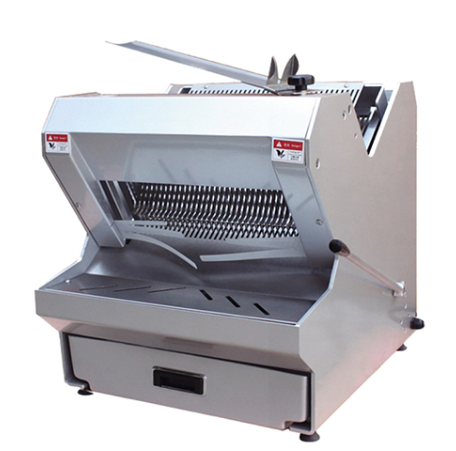
Most commercial bread slicers use a parallel blade assembly—the loaf passes through a fixed row of evenly spaced blades in one pass. Blade counts typically range from 31 to 52, depending on slice thickness.
Countertop vs. Floor Models
| Feature | Countertop | Floor |
|---|---|---|
| Volume | Low–Moderate | High |
| Footprint | Compact | Larger |
| Bread types | Soft–moderate crust | Handles crusty artisan bread |
| Best for | Cafes, delis, small bakeries | Production bakeries |
Bottom line: If slicing is a revenue generator (retail loaves, sandwich supply, wholesale orders), floor models are usually worth the investment.
Slice Thickness: Decide Before You Buy
Most commercial bread slicers have fixed blade spacing. Changing thickness usually requires a different blade assembly, not a dial adjustment. So choose based on what you sell most.
| Primary Use | Common Thickness |
|---|---|
| Sandwich shops | Approx. 1.2 cm (1/2 inch) |
| Toast programs | Approx. 1.6 cm (5/8 inch) |
| Retail packaged loaves | Approx. 0.9–1.2 cm (3/8–1/2 inch) |
If you sell multiple bread types that need different thicknesses, prioritize models with quick-change blade assemblies, or keep two blade sets for different thicknesses.
Troubleshooting Quick Guide
| Symptom | Likely Cause | What to Check First |
|---|---|---|
| Uneven slices | Motor strain or blade misalignment | Blade tension + whether motor can handle the load |
| Torn, crumbly slices | Dull blades or warm bread | Blade sharpness + bread core temperature |
| Stalls on crusty bread | Undersized motor | Consider upgrading to heavier-duty model |
| Compressed, flattened slices | Excessive feed pressure | Adjust feeding technique or switch to auto-feed model |
Maintenance: Good Slicing Depends on Cleanliness
Slice quality declines 8 out of 10 times because of poor cleaning. Crumb buildup is the most common issue—it looks dirty and directly affects slice quality.
| Frequency | Task | Why |
|---|---|---|
| Daily | Empty crumb tray | Keeps machine usable; prevents mechanical issues |
| Daily | Wipe exterior touch points | Hygiene and appearance |
| Daily | Check guards and feed area | Prevents unsafe shortcuts |
| Weekly | Clean internal crumb areas | Prevents quality decline and jams |
| Monthly | Inspect blade condition and tension | Maintains slicing consistency |
Important note: Crumb is the slicer's number one enemy. If not removed, crumbs harden over time and get stuck in blade guides, narrowing the gap and reducing blade clearance—this creates heat and can cause blades to break prematurely.
Safety: Simple but Non-Negotiable
Staff hands should never go near the cutting area during operation. Hard rules:
-
Always use the pusher to feed bread. If staff start hand-feeding, either training is lacking or the machine setup is wrong.
-
Power off before cleaning or clearing jams.
-
If anyone needs to reach near the blade area—power off, unplug, and lock out/tag out. No exceptions.
Final Pre-Purchase Checklist
Before you commit, confirm these basics:
-
Peak daily volume: Busiest day, not average
-
Bread types: Soft, crusty, seeded, high-hydration—motor and blade frame must match
-
Floor space: Countertop depth? Floor model clearance at the back for crumb tray removal?
-
Power supply: Voltage correct? Outlet type match?
-
Ease of cleaning: Is the crumb tray easy to pull out? Can you access the blades? This directly affects whether staff will actually do the cleaning
If possible, test before you buy—slice your most common loaf, then package it the way you actually sell it. If slices stack cleanly and bagging is easy, you are on the right track. If slices tear, bread binds, or bagging feels awkward, that machine will become a frustration during peak hours.
A properly matched slicer should be invisible during your busiest shifts. A mismatched one will remind you every single day.